
step-by-step home facial for glowing skin
whether you’re a skincare fiend or a person that likes to stay clean, daily routine care of your skin is important. but, when you have a special event coming up, how your skin looks underneath makeup is even more important!
have you been searching for a step-by-step guide for a facial at home?
whether you’re a skincare fiend or a person that likes to stay clean, daily routine care of your skin is important. but, when you have a special event coming up, how your skin looks underneath makeup is even more important! makeup only enhances texture, and it can take weeks - months to get it camera ready.
so, want to know how to prepare? let’s jump right in by learning about how to do a mini facial on yourself!
Where do I start?
I'm Kelli, owner/lead artist of The Understated Bride based in Los Angeles. I’m here to guide you through your beauty planning process with professional advice, tips, and tricks.
the best way to start is to have an aesthetician assess your skin type. they will recommend the best products + regimen for you. they may also book monthly - quarterly facials to meet your goal, depending on what you need.
during the weeks between facials, your skin may need some extra love. that’s why I created this guide on how to pamper yourself with an at-home mini facial!
*DISCLOSURE:
SOME OF THE LINKS BELOW ARE AFFILIATE LINKS. MEANING, AT NO ADDITIONAL COST TO YOU, I WILL EARN A COMMISSION IF YOU CLICK THROUGH AND MAKE A PURCHASE. REST ASSURED THAT I ONLY ENDORSE PRODUCTS THAT I HAVE PERSONALLY USED AND LOVE!
products you’ll need (you’ll base this on your skin type):
✴︎ makeup remover
✴︎ facial cleanser
✴︎ exfoliant
✴︎ toner
✴︎ treatments/serums
✴︎ masque
✴︎ facial oil (optional)
✴︎ moisturizer
✴︎ spf (daytime)
Step-by-step instructions
1: cleanse
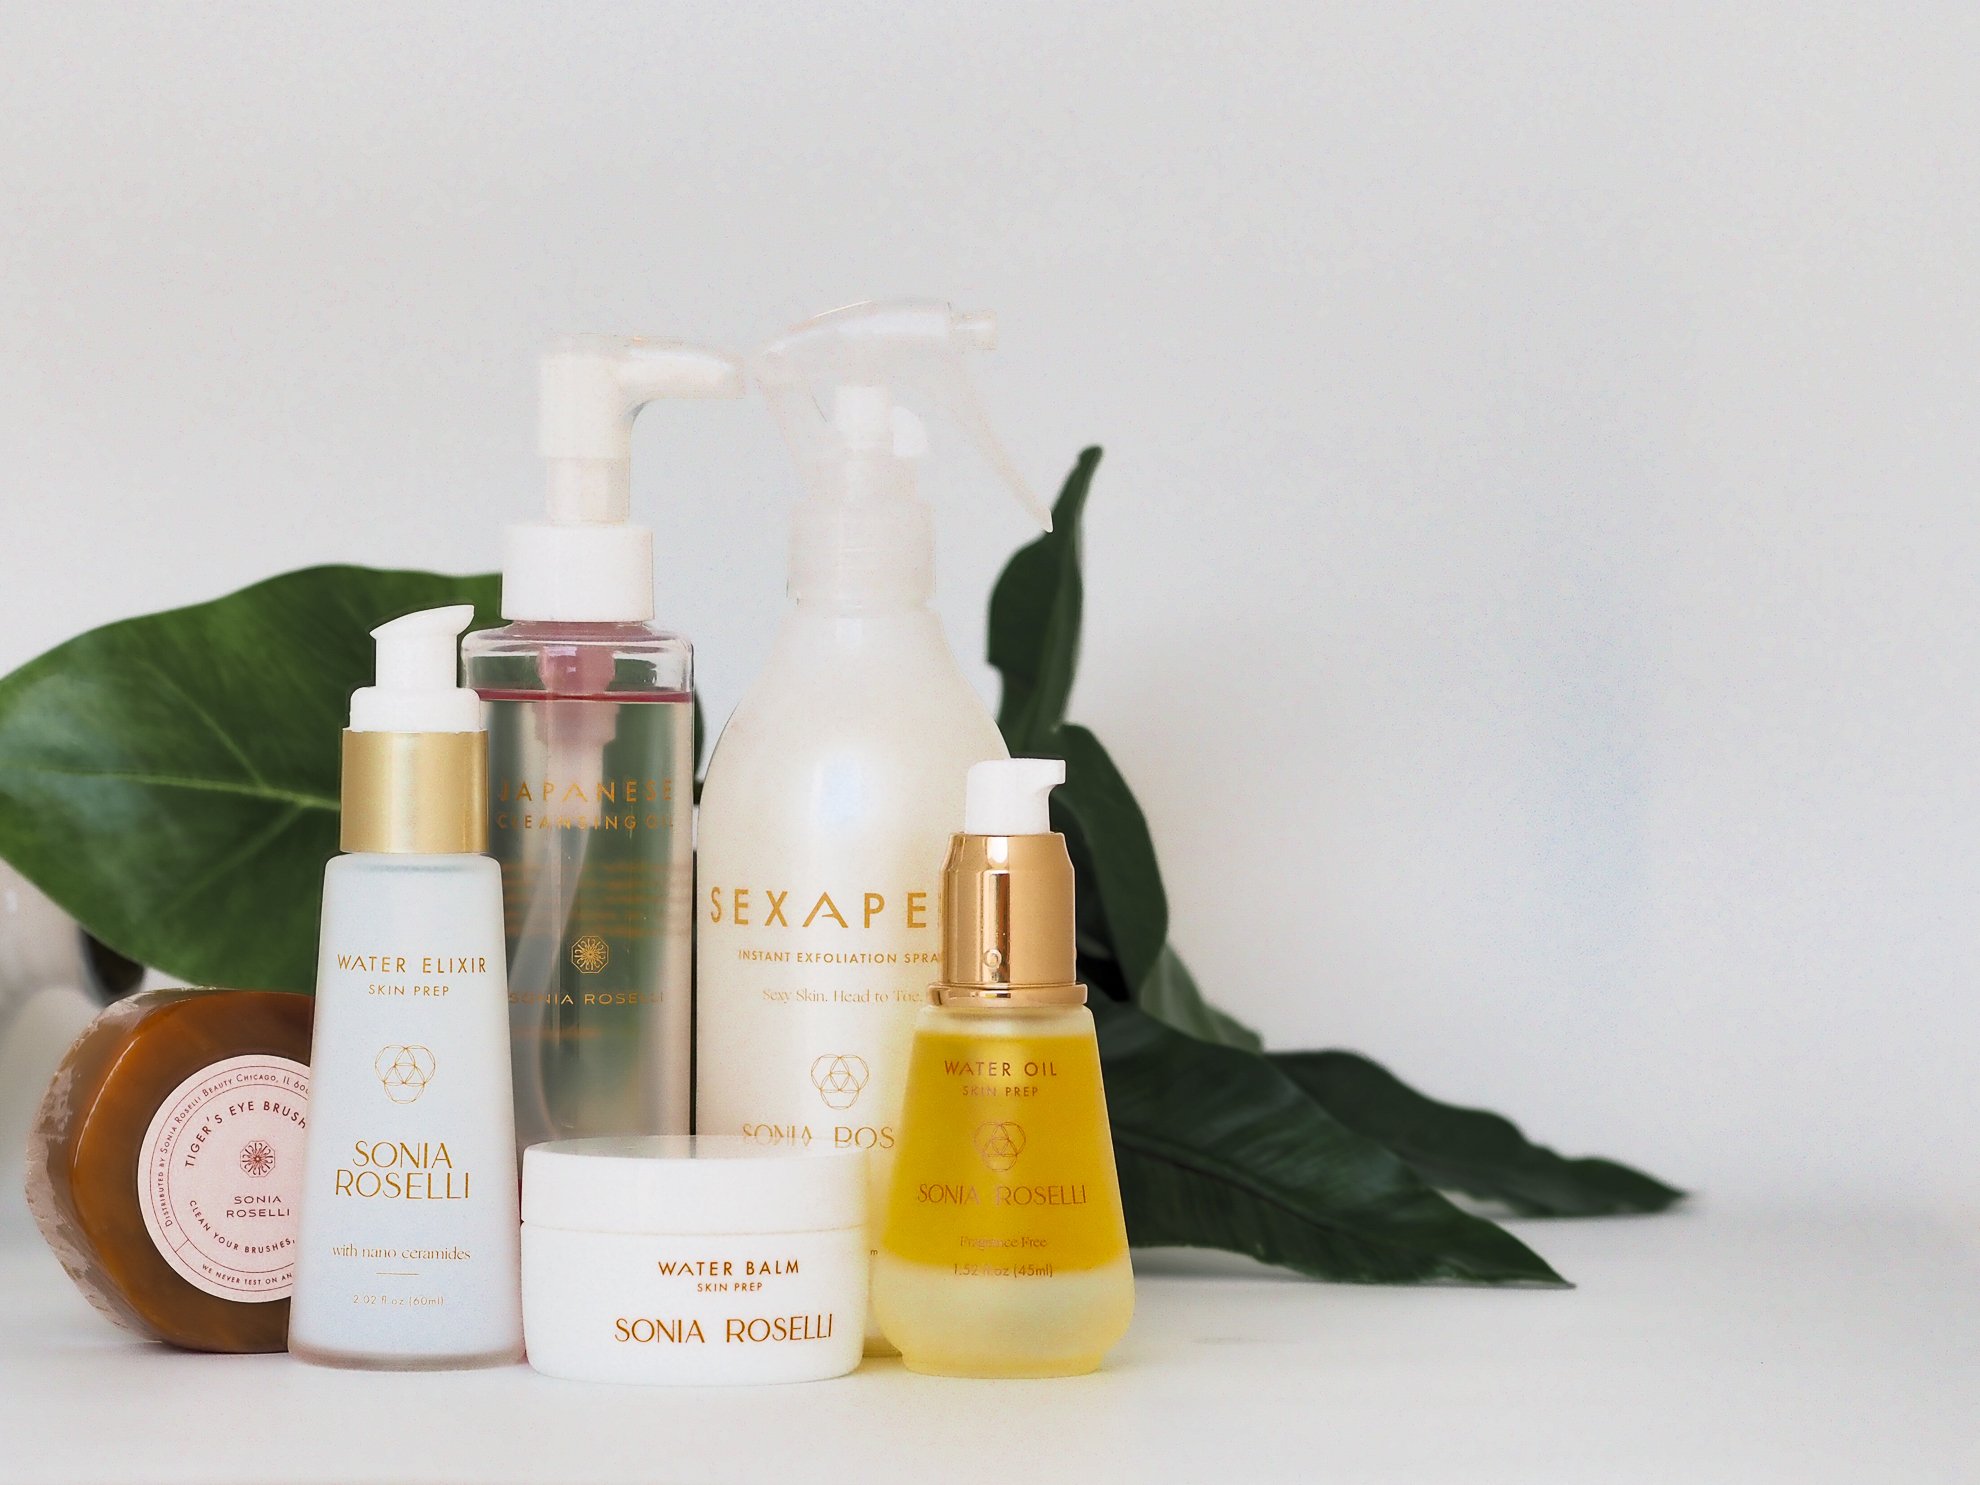
first, we want to remove any makeup (if applicable) with makeup remover or oil cleanser. one of my favorites is Japanese Cleansing Oil by Sonia Roselli (and yes, I actually use this in my personal stash!).
after we have removed any makeup, we are going to cleanse our face again with the recommended facial cleanser for your skin type (b o n u s: JCO works for this step as well!). we call this a double-cleanse. this ensures that the dirt/grime we have loosened on our face with the first cleanse is washed off with the second.
2: exfoliate
next, we’re gonna take some exfoliant, and slough off allll those yucky dead skin cells!*
(try Sonia Roselli’s Sexapeel - it’s literally baby-smooth magic)
this evens out the surface, creating brighter, softer skin texture. bonus: you'll get better absorption of your serums, too!
now, we could all use some more of that, right?
*do NOT do this step if you use Retinol products or acne medication such as Accutane, as it will irritate the skin.
rinse again, and this time, dry your face. while drying, make sure you’re pat-drying instead of scrubbing your skin.
3: tone
spray or pat some toner on your face to bring it back to its pH level (and, again, for deeper product penetration). there are many refreshing toners out there; some of my favorites are Murad Hydrating Toner, and G.M Collin's range of Treating Mists.
note that I am not giving any information on extractions, as those are best done by a professional. when done incorrectly, that’s how you can get infections and scarring!
4: spot treat
if you have any spot treatments / serums you like to use, go ahead and put them on now - from thinnest to thickest (pro tip!).
Sonia Roselli, a makeup artist I follow, created a serum called Water Elixir, which has hyaluronic acid for intense hydration. it’s fast-acting, which is amazing for makeup artists and consumers alike!
5: masque
apply a masque over your serums/treatments to let them sink in. choose one that is best for your skin type (hydrating, brightening, pore tightening, etc. - I use G.M. Collin). when the masque has been applied, let it sit for 10-15 minutes for best results. wipe clean, rinse and dry, again. apply some more toner and treatment - this time, you won’t rinse it off!
6: face oil
if you have dry skin and/or love an extra glow, pat a small amount of face oil on the high points of your face. I use Sonia Roselli’s Water Oil for this. pro tip: you can use it on top of makeup as well!
7: moisturize
next, apply some moisturizer. if you’re wearing makeup after your mini facial, try using Sonia Roselli’s Water Balm - it creates the perfect priming base for foundation.
8: SPF
and don’t forget SPF during the day (Supergoop! is great! they have a wide variety of SPF products).
there you have it, a step-by-step guide to an at-home mini facial!
Need a professional opinion?
you can always get your skin type assessed by a professional aesthetician. if you're looking for someone, book a consult with my skincare partner Jennifer De Vivo.
she recommends + uses G.M. Collin products exclusively in her facial treatments.
how can we help?
taking care of your skin is one of the most important steps in prepping for your wedding day. we take the time to understand every feature of our brides, down to her last freckle. beautiful makeup starts with a beautiful canvas. that’s why we focus on skin just as much as the makeup products we will use.
if you’re getting married - look into my 60-Day Skincare Plan. this plan includes a consult with Jennifer, a custom regimen, and a travel skincare set by G.M. Collin!
I’d love to chat + learn more about your wedding day vision. you can follow us on instagram + inquire with us to discover what it’s like to partner with us for your event.

How to choose false lashes for your wedding day
as a makeup artist, I carry a variety of lash styles in my kit. often, I have brides that prefer to spend time finding their ideal lash style + don’t mind doing the extra work!
as a makeup artist, I carry a variety of lash styles in my kit. often, I have brides that prefer to spend time finding their ideal lash style + don’t mind doing the extra work! so, here is our false eye lashes guide for those who want to curate their own lash style for their wedding day.
choose your ideal length + VOlume
length = short → medium → long → extra long
take into account how much lid space you have and where your brows sit in relation to your eyes.
the less lid space between your brows and lash line, you’ll want shorter lashes. the more lid space you have, you have the room to experiment with longer lengths (if you want!)
volume = wispy → fluttery → dramatic
the density of the lashes you choose also depends on your available lid space as well as your eye shape.
what is your eye SHAPE?
if you haven’t already, let’s determine your eye shape. take a good look at your eyes in the mirror to observe the following:
can you see the whole iris in your eye (the colored part) or is it partly obscured by your eyelids?
do your eyes slant upwards or downwards at all? for example, if you have downturned eyes, winged lash styles will make your eyes look heavier. this in turn will give the illusion that your eyes are even more downturned than they actually are. crazy, right?
do you have a visible crease under your brow bone?
how much space do you have between your eyes? measure this by using your fingers to span the width of one of your eyes + see if that width fits between your eyes. if the space is smaller than the width of one of your eyes, you have close-set eyes. if the space is larger than the width of one of your eyes, you have wide-set eyes.
with so many eye shape charts out there, we should simplify into the following categories:
ALmond eyes
if you have a slight point on both sides of your eye, with a wider center, you may have almond shaped eyes. most lash styles look great on almond eyes! so if you were planning to experiment with a variety of lengths and fullness, you’re in luck.
try: full, evenly distributed lashes
Round Eyes
if you can see your entire iris, you most likely have round eyes. some strip lashes have a difficult time adhering to round eyes due to their curvy shape. to make this easier, look for styles with curved bands.
avoid: heavy lashes that can flatten your eye shape
try: curly/curvy band styles, wispy or fluttery styles
mono-lidded eyes
if little to no crease is visible, you may have this eye shape! mono-lidded eyes look lovely with voluminous, multi-layered lashes.
avoid: thin lashes
try: fluttery lashes to open the eye
prominent (protruding) eyes
if you have large eyes that stand out, and have an appearance of a “lower lid” - then this may be your eye shape. sensational lashes and/or winged styles can actually help balance the look.
avoid: thin lashes
try: dramatic, feathery styles
downturned eyes
if your eyes can look “heavy” or “sad” on the outer corners, you probably have a downturned eye shape. lift the eye by focusing on length in the center of your eyes.
avoid: winged lashes
try: length in the center of the lash
upturned eyes
upturned eyes have a natural “flick” at the ends + are perfect for a cat-eye look.
try: winged styles, flared half-lash in outer corner
close set eyes
based on our measurement trick above, if you have this eye shape (like I do!) - follow this tip: concentrate on the outer corners to extend the eye outwards.
avoid: fullness near the inner corner of the eye
try: winged lashes (with or without length in center), flared half-lash in outer corner
wide set eyes
if the space between your eyes is larger than the width of one of your eyes, you have wide-set eyes. bring more attention to the center of each eye with longer lashes in that area.
avoid: winged styles
try: uniform fullness in the lash with length in the center
deep set eyes
if your eye sit far back under your brow bone, you have deep set eyes. aim for extra long lashes to extend past your brow bone. you also don’t want these to be too curly since we want to avoid any unsightly mascara smudges on the brow bone.
avoid: short lashes
try: extra-long lashes
HOODED EYES
if you have a crease, but your eyelid is not clearly visible when your eye is open, you may have hooded eyes. since we are aiming to open the eye, go for longer lashes in the center.
avoid: winged styles or heavy lashes
try: fluttery lashes with length in center
when to choose individual / clusters
if you don’t want a visible band, individual and cluster lashes may be a preferable choice for you. but, some strip lashes do come with a clear band!
as an artist, sometimes I use individual lashes and/or clusters for more versatility. this type of application does take longer, so I personally prefer to leave this option for my brides only.
lastly, vibe check
keep your wedding mood board in mind when styling your makeup, hair + accessories. if you have an outdoor elopement in the middle of the woods, glamorous lashes may feel out of place. this is true even if you do have prominent eyes, which would be the perfect candidate for a dramatic style!
if you need assistance choosing your ideal lash style, or are looking for a beauty team for your wedding day, we should chat! you can also check out our instagram for inspiration, real brides, and plenty of advice!

“How much should I plan to spend on my bridal makeup trial run?”
if you recently started planning your wedding, you must be so excited to jump in! you may also be wondering how much to budget for your hair and makeup services.
if you recently started planning your wedding, you must be so excited to jump in! you may also be wondering how much to budget for your hair and makeup.
hi! I’m Kelli, founder of The Understated Bride based in Los Angeles, California.
our style is to bridge the gap between bridal + editorial beauty. how? by collaborating with you to create an original, fashion-forward look.
in this post, let's address some questions you may have about booking a trial run for your bridal hair + makeup.
if you’re one that likes to plan ahead, here’s an idea of what you should expect for the trial run or “preview” (as I like to call it!) of how the wedding day experience will go. I don't see this as a test of your artist’s skills - after all, you reached out because you love what you’ve already seen! so let’s start with a comparison of the same day, with the same artist - yet two different scenarios.
Let’s imagine for a second…
envision waking up the morning of your wedding day - relaxed, yet excited for the joy that this day brings.
having met your artist a few months ago, you have peace of mind that she will arrive right on time! so, you check your phone to respond back to all those wishing you love + happiness on your special day. as your bridal party trickles in for their beauty prep, you enjoy mingling with everyone. your maid of honor puts on a wedding playlist with your faves, and the excitement of the day has finally begun! you refer to your custom beauty prep timeline* and head off to shower.
now it’s time to get your makeup + hair done! in the preview session, your artist noted any preferences you both discussed. since you have followed her custom recommendations, your skin is smooth and glowing! at this point, your beauty plan is now in action, and you can expect your look to last through the night. thank your customized skin prep plan* for that!!
when your hair + makeup is complete, your artist hands you a mirror.
“this is exactly what I wanted! a more enhanced, elevated version of myself.
s o o o glad we figured out these details beforehand.”
now that both of you are completely happy with the look, it’s time for you to get into your dress!!
On the other hand…
now let’s imagine another scenario, with the same artist, but no preview beforehand.
you wake up, and immediately reach for your phone to message your artist, whom you haven’t met before today.
“hi, just wanted to make sure you were arriving at 8am.”
as planned, she arrives promptly and starts on your bridal party right away. everyone is having a wonderful time so you go ahead and start getting ready for your appointment. while you wait, you shower, complete your typical skincare routine (if any), and brush your teeth.
finally, it’s time to get your hair + makeup done! you’ve saved a bunch of inspiration photos to show her and cross your fingers that she'll be on the same page. her portfolio looks amazing, so you hope you’re in good hands. she asks you some questions and gets right to it!
first off, she notices your skin isn’t as hydrated as she would hope, so she advises you to start drinking some water. she then lets you know she’ll need to spend some extra time prepping your skin for makeup. you’re nervous about the time delay, but you remind yourself that the wedding can’t start without you!
gauging the reactions of everyone around you, you start to relax as you hear their comments.
“you look gorgeous”
“I can’t wait to see you in your dress!”
your artist is relatable + easy-going, which allows you to unwind and enjoy feeling pampered. finally, she hands you a mirror and asks if you’d like any adjustments. she did exactly what you asked for, but now you’re having second thoughts.
“I’m so sorry! I thought a dewy look would suit me, but I realize that I prefer my skin to look more matte. another thing - I know I originally wanted thicker lashes but do you have time to put on individual lashes instead? and what do you think about adding winged liner? I was also thinking to pull some hair down to cover my ears a bit.”
before making these adjustments, she lets you know that she’ll need an extra half hour. you agree, and let your photographer know that you’ll be running late.
after the ceremony, you notice that your artist was right. dehydrated skin affected the wearability of your makeup. your skin sucked in all the moisture it could get, leaving the makeup looking dry and a little flaky in areas. what’s even odder is that your oily areas aren’t dry at all but seem to need to powder often to remove the shine! this is inconvenient, since there isn't much time to check on your makeup between the speeches, dinner, and dancing.
at this point, there’s not much you can do. so you decide to just enjoy the rest of your wedding experience.
After all, it’s only makeup, right?
in both scenarios, your artist is professional, skilled, and a great fit for you. so what is different?
the common theme is that without the preview, you may run late + feel more on edge if things don't go as planned. another side effect is how long your makeup lasts without enough preparation ahead of time. skin prep in the months beforehand is the KEY to long-lasting makeup.
our intention is to provide a glimpse of the getting ready process before your wedding day. this is also an opportunity for us to collaborate ideas for your hair + makeup, taking your features and preferences into account.
What costs and other details should I plan for?
now that we know what your wedding day could look like after booking a preview, let’s talk about money/logistics. and it all depends on a few details:
In-Studio or On-Location Appointment
is the artist traveling to you? if so, expect an extra fee to cover the transportation costs + extra time set aside for travel. this is typically calculated by the round-trip mileage from the artist’s base location + can range from $0.575 - $2 per mile.
Makeup Only, Hairstyling Only, or Both?
are you requesting both makeup/hairstyling? as these are two separate skill sets, your artist may prefer to hire a second professional. this allows each expert to focus on one type of service, with a shorter appointment time. if you and your artist have discussed having one person do both, that is common too! expect to double or possibly triple the time set aside for the appointment. your artist will need time to set up + break down both kits as well as transition between both types of services.
Plan Ahead for Gratuity
while optional, gratuity is customary for exemplary service. if you are happy with your preview experience, show your artist by giving them a little extra! although 20% is standard, any percentage between 15-30% is always appreciated. most artists prefer cash, and some have some easy e-transfer options available - such as Venmo or Zelle.
Appointment Length
preview appointments typically take longer than the wedding day appointments. you may want to try a few different looks and/or make adjustments as you go along. a well-seasoned professional may charge the same rate (or slightly lower) for a preview as they do for your wedding day. this is affected by where the preview is held, and how many other appointments the artist is able to book that day.
for example, I offer both in-studio and on-location preview appointments. although I am able to provide either hairstyling or makeup services, I do prefer doing one or the other. when available, I hire a trusted artist to work alongside me. tag-teaming benefits you by allowing me to devote my focus on one skill at a time. typically, I’ll schedule 1.5 hours per service to allow for adjustments or a style change, if requested.
now that you know the in’s and out’s of preview appointments, it’s time to use this newly learned info. choose an artist whose style, processes, and professionalism resonate with you. if you don’t know where to start, you can access our preview rates by inquiring below!